Welcome to ioloVPN's online help! This help system contains all the information you need to use ioloVPN effectively.
ioloVPN ensures your online privacy and provides secure, encrypted access to the Internet from anywhere around the globe. With identity theft, unsecured WiFi hotspots, and assaults on online privacy spreading rapidly, ioloVPN allows you to protect your data while accessing the Internet from WiFi hotspots, hotels, airports, and corporate offices.
The information is organized into the following sections, which you can click in the navigation panel to your left
ioloVPN is a VPN. A VPN, or Virtual Private Network, secures and privatizes data across the Internet by building an encrypted “tunnel.” Data passes through this tunnel scrambled beyond recognition. Even if it were intercepted, it would be useless to anyone who does not possess the key to decrypt it.
When you activate ioloVPN, it quickly builds this encrypted tunnel through your Internet connection to one of our secure Internet gateways. All Internet data between you and ioloVPN is now encrypted, and no one can view your information, including your Internet Service Provider. Further, your protection and privacy is not limited to just browsing. ioloVPN encrypts all your Internet data to and from our gateways, including web browsing, instant messaging, streaming, VoIP and email.
ioloVPN also assigns you a temporary private IP address from our gateway. An IP (or Internet Protocol) address is a numerical label that is assigned to devices participating in a computer network that uses the Internet Protocol for communication between its nodes. Your public IP address will be from whichever ioloVPN server you are connected to for that session. This private IP address cannot be traced by anyone nor can anyone find your real IP address or location.
Once your data reaches our secure Internet gateway, we send it to its destination. This process is safe because it would be virtually impossible to access data between a secure data center over an actual Internet backbone link. It is virtually impossible to break into a guarded data center with biometric scanners and other security measures.
When we receive the data from your destination server, we send it to you through the encrypted tunnel so no one can intercept it.
The best part is that this only takes milliseconds. You won't even notice that it's happening.
After you install ioloVPN, you can determine when ioloVPN is loaded (when the software has started up on your computer) and when it is activated (when a connection has been established from your computer to our server and data encryption has started). You can manage both of these automatic controls in the Managing Your Settings section.
You can manually load ioloVPN if it is not set up to automatically load when your computer starts up by going to Start > All Programs > ioloVPN on your PC, or by clicking the ioloVPN desktop icon on your PC.
You can manually activate ioloVPN if it is not set up to automatically activate when you open a browser window. Note that ioloVPN must be loaded for it to be activated. If ioloVPN has been loaded, one of three icons will appear in your system tray:
ioloVPN has been loaded and it is currently deactivated.
ioloVPN has been loaded and it is currently activated.
ioloVPN has been loaded but is not needed because you are accessing a secure (WPA, WPA2, or wired) connection.
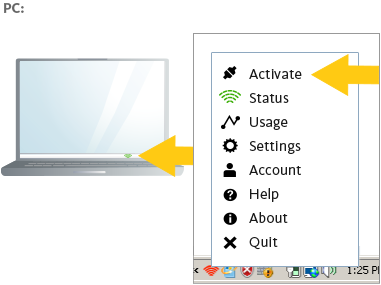
To manually activate ioloVPN:
Click on the ioloVPN icon in your taskbar/menu bar. The ioloVPN menu appears.
Select Activate.
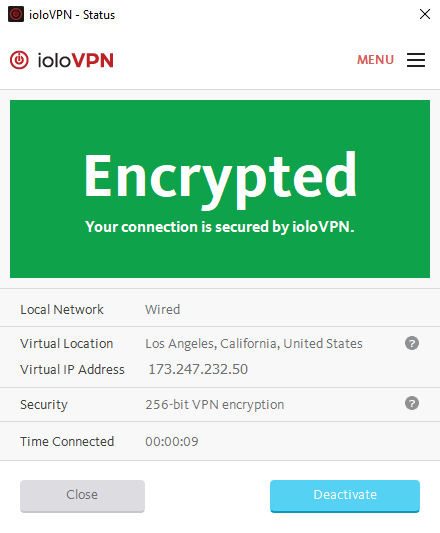
ioloVPN activates after a few moments. In addition, the ioloVPN icon in the system tray turns from red to green:
To deactivate ioloVPN:
Click on the ioloVPN icon in your taskbar/menu bar. The ioloVPN menu appears.
Select Deactivate. ioloVPN is deactivated.
Note: Even though ioloVPN is deactivated, it is still loaded. The ioloVPN icon in the system tray turns from green to red,
which indicates that no privacy protection is currently taking place. If you want to close ioloVPN, right-click on the system tray icon and select Quit.
Your ioloVPN settings allow you to manage when to activate ioloVPN.
Viewing Your ioloVPN Settings
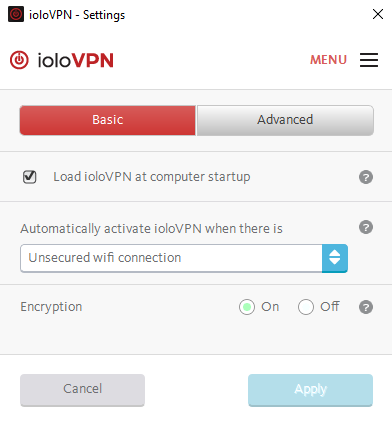
You can view your ioloVPN settings by right-clicking on the ioloVPN icon in your system tray, and then selecting Settings. The Basic settings screen appears.
The Basic settings screen contains the following fields:
Load: ioloVPN at computer startup: Select this checkbox if you want ioloVPN to load when your computer is running. This setting is selected by default. For more information about activating and deactivating ioloVPN, see Loading, Activating and Deactivating ioloVPN.
Automatically Activate ioloVPN when there is: This drop-down menu contains three options:
Unsecured wifi connection: ioloVPN automatically starts only when you are accessing an unsecured WiFi network. This setting is selected by default.
Any Internet connection: ioloVPN automatically starts whenever you connect to the Internet.
Never – activate manually: ioloVPN does not start automatically, only when you manually load and activate it.
After changing your basic settings, click Apply to apply them.
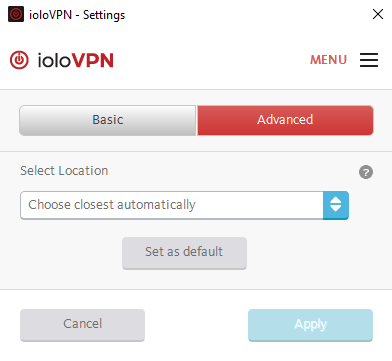
Click the Advanced tab to view the Advanced settings. The Advanced settings screen appears.
The Advanced settings screen contains the following field:
Select Location: This drop-down menu allows you to change the server location you are accessing.
Note: We have many servers located throughout the world. ioloVPN assigns these servers automatically, but you can use this menu to choose a different location if you wish.
You can view your ioloVPN account information by right-clicking on the ioloVPN icon in your system tray, and then selecting Account. The following information appears:
Account: The type of account you have.
Email: This is the email address used during the installation process. Customers use this email address as their username when logging into ioloVPN.
Device: This field displays the device name entered during the installation process.
Devices authorized: This field displays the number of devices authorized to the account.
Devices registered: This field displays the number of devices registered to the account.
Expires/Renews on: This is the date on which your subscription expires and/or renews.
Manage Account: An active subscription allow a certain number of mobile and laptop devices. These users can use the page that displays when they click this button to manage the devices they wish to include in their subscription.
Forgot/Change Password: Click this button if you have forgotten your password and need to change it. A reset link is sent to your email address which allows you to change your password. You also enter your new password in the page that appears and then click Save Password.
Buy: Click this button to buy an ioloVPN subscription. This button only appears if you do not currently have an active subscription.
 ioloVPN has been loaded and it is currently deactivated.
 ioloVPN has been loaded and it is currently activated.
 ioloVPN has been loaded but is not needed because you are accessing a secure (WPA, WPA2, or wired) connection.